

All the years of ultrasound training in residency has paid off. You found the large pericardial effusion in the hypotensive patient who is still alive, but looks sick. You are a star! The only problem was that you never performed a pericardiocentesis in an awake patient. The cardiology fellow is at home sleeping and/or the closest receiving hospital is about 1 hour away. Now what?
Dr. Arun Nagdev reviews how to do an ultrasound guided pericardiocentesis as part of this new, ongoing series of advanced ultrasound tips for emergency physicians.
Simplified in-plane, ultrasound-guided technique
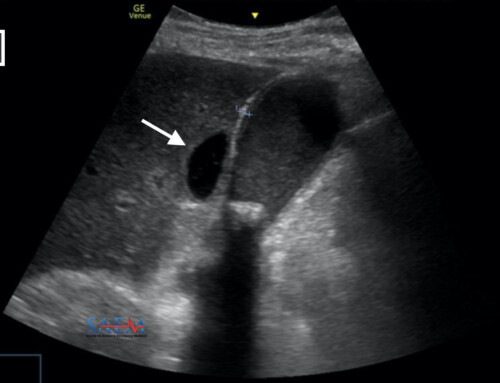
Step 1: Identify the pericardial effusion
Place curvilinear probe in the parasternal long axis with identification of the circumferential pericardial effusion. Note the right ventricular free collapse during diastole (open mitral valve). RV (right ventricle), LV (left ventricle) and AO (aortic outflow).
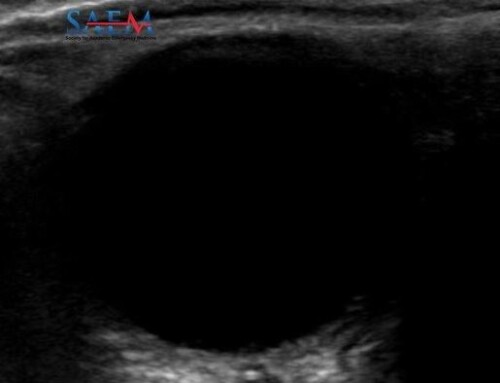
Step 2: Evaluate the IVC
Subxiphoid evaluation of the inferior vena cava (IVC): Place the probe just right lateral to the midline with the probe marker facing cephalad. Note the plethoric IVC.
Ultrasound Tip:
For those who have the time and want to make sure not to hit the mammary arteries, place a high frequency linear transducer (10-5 MHz) just left of the sternum. Color Doppler can visualize the vessels clearly and make you more comfortable.
Step 3: Position the ultrasound machine and yourself
Place the patient on a cardiac monitor and obtain a standard parasternal long axis view. The ultrasound system should be positioned to the right of the patient with the operator on the patient’s left, allowing a direct view of the ultrasound screen while performing the ultrasound-guided periocardiocentesis. The needle will be placed in plane with the ultrasound probe under direct visualization. (Standard sterile procedure not shown.)

Step 4: Local anesthesia and equipment
Infiltrate local anesthetic with a standard 25g (1.5 inch) needle over the site of planned needle entry. Also, place the anesthetic deep to the skin surface and just above the rib, while avoiding the neurovascular bundle. Like all procedures that involve leaving a catheter in the patient, sterile precautions should be taken and the ultrasound transducer should be covered with a sterile sheath. If you are lucky to have a pericardiocentesis kit, use the needle supplied, otherwise the needle from a triple lumen kit or an 18g – 20g spinal needle should be attached to a 10 cc syringe. An in-plane technique is used to ensure needle visualization during the entire procedure. Place a 5-2 MHz curvilinear transducer on the chest and obtain a parasternal long axis view. Enter the skin at a steep angle (45 degrees or greater) and watch the needle as it enters the pericardial space.
Step 5: Ultrasound-guided needle insertion
Visualize the needle as it enters the pericardial effusion. Procedural sedation may be helpful in awake patients. Under direct ultrasonographic visualization, aspirate fluid and slide the guidewire into the pericardial space. Standard Seldinger technique will allow for placement of a single lumen catheter into the pericardial space. Point-of-care ultrasound can be used again to demonstrate a decrease in the size of the pericardial effusion, as well as increased respirophasic variability of the IVC.
Step 6: Ultrasound confirmation of success
After pericardial catheter placement, use the ultrasound confirm reduction in effusion, a lack of right ventricular free wall collapse, and a normal respirophasic IVC.

Arun Nagdev, MD
Director, Emergency Ultrasound
Department of Emergency Medicine
Highland General Hospital
UCSF Assistant Clinical Professor of Emergency Medicine
