
One advantage of simulation as an educational tool is the re-creation of cognitive and emotional stresses in caring for patients. Doing this for a high fidelity scenario is relatively easy – add additional patients, make a them loud, combative, or otherwise cantankerous, and add interruptions for good measure. However, when training for procedures in the simulation lab, we practice the procedure in isolation on a “task trainer” without cognitive and emotional stress for context. An off-the-shelf task trainer can do a superb job of teaching the mechanics of performing a procedure, but they lack complexity necessary to train for performing the procedure under stress.
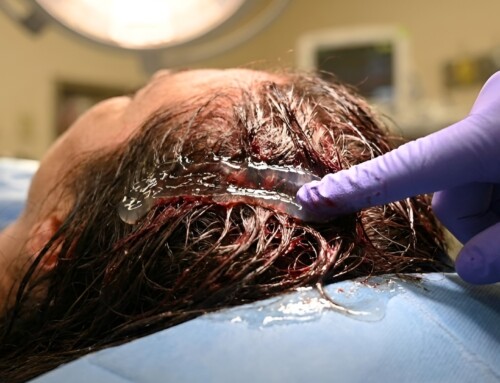
For cricothyroidotomy, a procedure that is essentially performed blind due to blood and small spaces, adding additional realism means crafting a model that not only contains the correct anatomic landmarks, but also has the ability to bleed significantly enough to obscure the view of the performer. To borrow a phrase from Cliff Reid and from the military, to be able to perform these procedures expertly we must “train like we fight”.1,2 The following trick involves making a silicone-based skin layer which will bleed profusely when cut into.
Simulation Trick of the Trade: A Bleeding Cricothyroidotomy Model
Procedure
- Get a 8”x 8”cake pan and liberally spray with silicone releasing agent

- Use a silicone rubber mix, such as Dragon Skin which is used for movie costumes and in animatronics. Combine approximately 1/3 cup of part A with 1/3 cup of part B, along with several drops of a coloring agent in a cup.
PART A

PART B

COLORING AGENT


- Pour the silicone mixture into the prepared cake pan and spread to make a very thin layer (about 2 mm). Any bubbles in the mixture should rise to the top and pop by themselves. You can speed this process by agitating the mix, such as beating it against a solid object.


- Leave the cake pan on a level surface for whatever the recommended drying time is for the product you picked. Typically this is an overnight process.
- Remove the thin sheet of silicone from the pan. Cut a 4”x 8”section and a 3”x 3”square.


- Cut off the Luer lock end of a 32-inch IV extension set and rest this end on top of the 4”x 8”rectangle piece, along with a small amount of polyfill material (a polyester stuffing commonly used in pillows and clothing). The polyfill helps disperse the “blood” evenly in the pocket and helps obscure view of the cricothyroid membrane when the skin is incised.


- Glue the smaller silicone square on top of the larger rectangular piece, while sandwiching in the IV tubing. Use silicone glue to make sure all the edges are sealed to create a completely closed pocket between the two silicone pieces. Be careful to not get any glue on the tip of the IV tubing. To ensure all the edges are air tight, attach a 20-30 mL syringe on the IV tubing and gently apply suction. If you have a leak, continue to liberally apply glue to the margins of the 3”x 3”square until it is sealed.


- Let dry again overnight.
See it in Action!
The video below shows how using this bleeding model can supplement a cricothyroidotomy simulation procedure but adding the realistic effect of active bleeding.
Quick pointers
- For heightened realism, lay this skin over the top of a sheep or pig trachea as they have the anatomic landmarks most similar to human anatomy with a realistic tissue feel. If unavailable, a plastic training model would work. There are also some jerry rigged models you can make with ventilator tubing and tape that would work in a pinch. The end product model can be a bit messy so I would be hesitant to put this skin over something of significant financial value such as the majority of the high fidelity simulation manikins.
- Thinness is key. Getting the layer of silicone to be thin and even is quite challenging but well worth the extra effort. If the “skin”is too thick, you won’t be able to palpate landmarks thus hindering the realism of the procedural trainer.
- Most of these supplies can be ordered online. The polyfill material used in step 6 can be purchased at any hobby shop.
- I used a commercially available 2-part silicone mix that has a slow set up time. You may be able to speed the process along by using a mix that has a faster set up time. For me, it takes at least 2 days (of mostly drying time) to fully make the “bleeding skin” model.
This post contains images and references to several commercial products. I have no financial stake in the companies that make these products and no conflicts of interest to disclose.

Jeffrey Hill, MD
Assistant Professor
Department of Emergency Medicine
University of Cincinnati

