
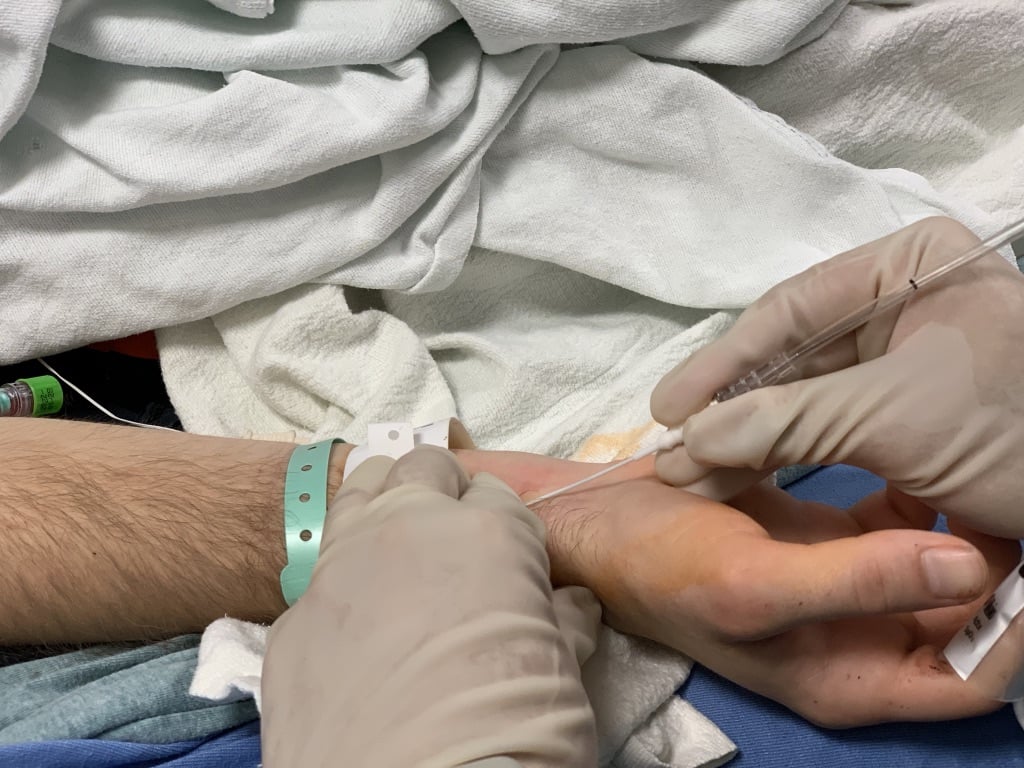
 A 63-year-old male presents for acute onset of headache, neck pain, and altered mental status. He has a prior history of hypertension and hyperlipidemia but recently lost his insurance and has been unable to fill his medications. As a well-informed 2nd year resident, you suspect the presence of a ruptured subarachnoid hemorrhage and arrange an expedited trip to the CT scanner. The patient’s blood pressure continues to remain elevated and you initiate an antihypertensive drip. You decide that in order to have accurate titration, you need more reliable data and decide to place a radial arterial line. However, the last two arterial lines you placed did not go according to plan! Before you start the procedure, you decide to review the procedure and some common pitfalls in placing radial arterial lines. You remember your attendings telling you during prior attempts to do things a certain way and you want to incorporate these in your practice.
Problem: Arterial line placement is a common procedure in the Emergency Department, but can be challenging.
Gap: There are particular microskills to master in order to successfully place an arterial line – and these skills decay over time. Most of these skills are different from placing an angiocatheter in a vein or from doing an arterial blood gas draw.
Hook: Using just-in-time teaching, the learner can focus on the microskills to successfully place the arterial catheter just before performing the procedure.
If just-in-time teaching is a new concept, please see read ALiEM’s post about just-in-time teaching.
While this article may be read in entirety, the piece is intended to focus on the specific microskills of arterial line placement. As the teacher or learner, identify specific microskills from the procedure that have proven difficult and focus on these subsections. Success of the entire procedure will come from focused mastery of the individual microskills.
The Process
1.Does the patient need an arterial line?
- Indications: Consider placing an arterial line in patients who need reliable real-time hemodynamic monitoring or frequent arterial blood gas testing
- Contraindications: Overlying burns or cellulitis, risk of compartment syndrome, absent or diminished pulses, Buerger syndrome, Raynaud’s syndrome, or a proximal dialysis fistula
- Risks: Pain, failure of technique, bleeding, damage to the artery leading to digital ischemia via thrombosis or embolization, infection, nerve damage
2. Set yourself up for success:
- Positioning the hand for success is key. You want the patient’s palm facing up with the wrist slightly extended over a towel or small roll and held in this position by an assistant or by gently taping the hand in place to help the patient remain still. Have a table available to place the patient’s arm on in order to support the arm and improve exposure of the radial artery.
- Elevate the bed so you are in a position of comfort.
- Set up the rest of the equipment. Have your assistant set up the arterial line tubing and calibrate it. (Pro-tip #1) Make sure the tubing is set up and the connector is close-by.
3. Feel the pulse:
- Using the tips of 2nd, 3rd, and 4th digits allows you to get a good idea of the direction of the artery. The pulp space of the fingers provides the best tactile information. When the pulse is weak, use light pressure to avoid compressing the vessel.
- Be careful of over-extending the wrist, which will also compress a low-pressure artery in cases of hypotensive patients.
4. Mark the landmark:
- In general, having a good idea of where the artery is and the direction of the artery is helpful as you negotiate the best site to place the arterial line. Point-of-care ultrasound (POCUS) helps illustrate this (see below). If using POCUS just for skin marking, it is important to be aware that any movement of the wrist may affect the accuracy of the marked skin site.
- (Pro-tip #2) Consider using something to wedge behind the wrist and taping the hand securely to prevent the patient from moving.
- Again, over-extension of the wrist with the secured tape may dampen an already low-pressure artery in cases where the patient is hypotensive.
5. Consider anesthetics:
- Injecting lidocaine into the skin causes localized edema that may distort the optimal ability to feel the pulse. It can also cause vasospasms that also affects tactile success.
- (Pro-tip #3) Consider using topical anesthetics such as topical lidocaine 4% cream, lidocaine/prilocaine cream, lidocaine/tetracaine patch, or a skin refrigerant anesthetic spray.
6. Clean the skin and get your equipment ready:
- Sterilize and drape the intended insertion area using all standard precautions.
- (Pro-tip #4) Place a sterile probe cover over the ultrasound transducer if utilized for real-time needle tracking.
7. Handle the equipment:
- Holding the catheter (Microskill #1): Do you hold the angiocath between the thumb and 3rd digit, with the 2nd digit ready to advance the angiocath? Note that this technique is similar to venous cannulation. Or do you hold it like a pen with the 2nd and 3rd digit opposed by the thumb, advancing into the skin, and ready for your free hand to further advance the angiocath? Find the position that works for you and consider an alternative approach if your first few attempts did not go as planned. See images below.
- Angle of insertion (Microskill #2): The radial artery is very shallow. Depending on your approach, the angle of insertion varies significantly. Specifically, holding it like a pen requires the angle to be 30-45 degrees from the skin. Holding it between your thumb and 3rd digit allows a shallower insertion angle (10-15 degrees from the skin). This will influence the depth you travel to insert your needle. (Pro-tip #5) Once you see blood enter the tube, you will need to lower your hand to a more shallow angle and then advance to remain in the vessel.
- Stabilizing the hand that drives the angiocath (Microskill #3): If using the thumb and 3rd finger maneuver, rest the volar aspect of your wrist onto the patient’s palm. If using the pen technique, rest the medial aspect of your hand along the hypothenar eminence.
- Advancing the angiocath (Microskill #4): Whichever method you decide to use to advance the angiocath, it is important to anticipate placing counter traction to the thick epidermis, away from the direction of the angiocath. Using your free thumb works best to anchor the epidermis. Advance the needle with the bevel up and away from the direction of the artery (towards the patient’s arm).
- Confirming placement (Pro-tip #6): If you decide to blindly place the arterial line, you can use POCUS to confirm placement. Taking out the needle within the angiocath will also confirm placement with blood pulsating out of the catheter.
- Securing the catheter: Suture the angiocath. Consider using the roman-sandal technique of tying the suture around the angiocath. Be careful with taking a big bite with the suture; the radial artery can be very superficial. Consider placing an antimicrobial cylinder at the insertion site. (Pro-tip #7) Wrap the IV tubing around the thumb and place a large tegaderm to secure the arterial line. If you are using a regular 20-gauge angiocath, clearly label the tubing proximal to the catheter “Arterial” to prevent confusion during patient hand-off to the hospital unit.
8. Step-by-step visual guide for arterial line placement:

Figure 1: Angle the radial artery catheter with fingers pointed towards the direction of the artery (more common technique).

Figure 2: Angle the radial artery catheter with wrist flexing along the direction of the radial artery (alternate approach).

Figure 3: Lower the angle after the flash of blood occurs.
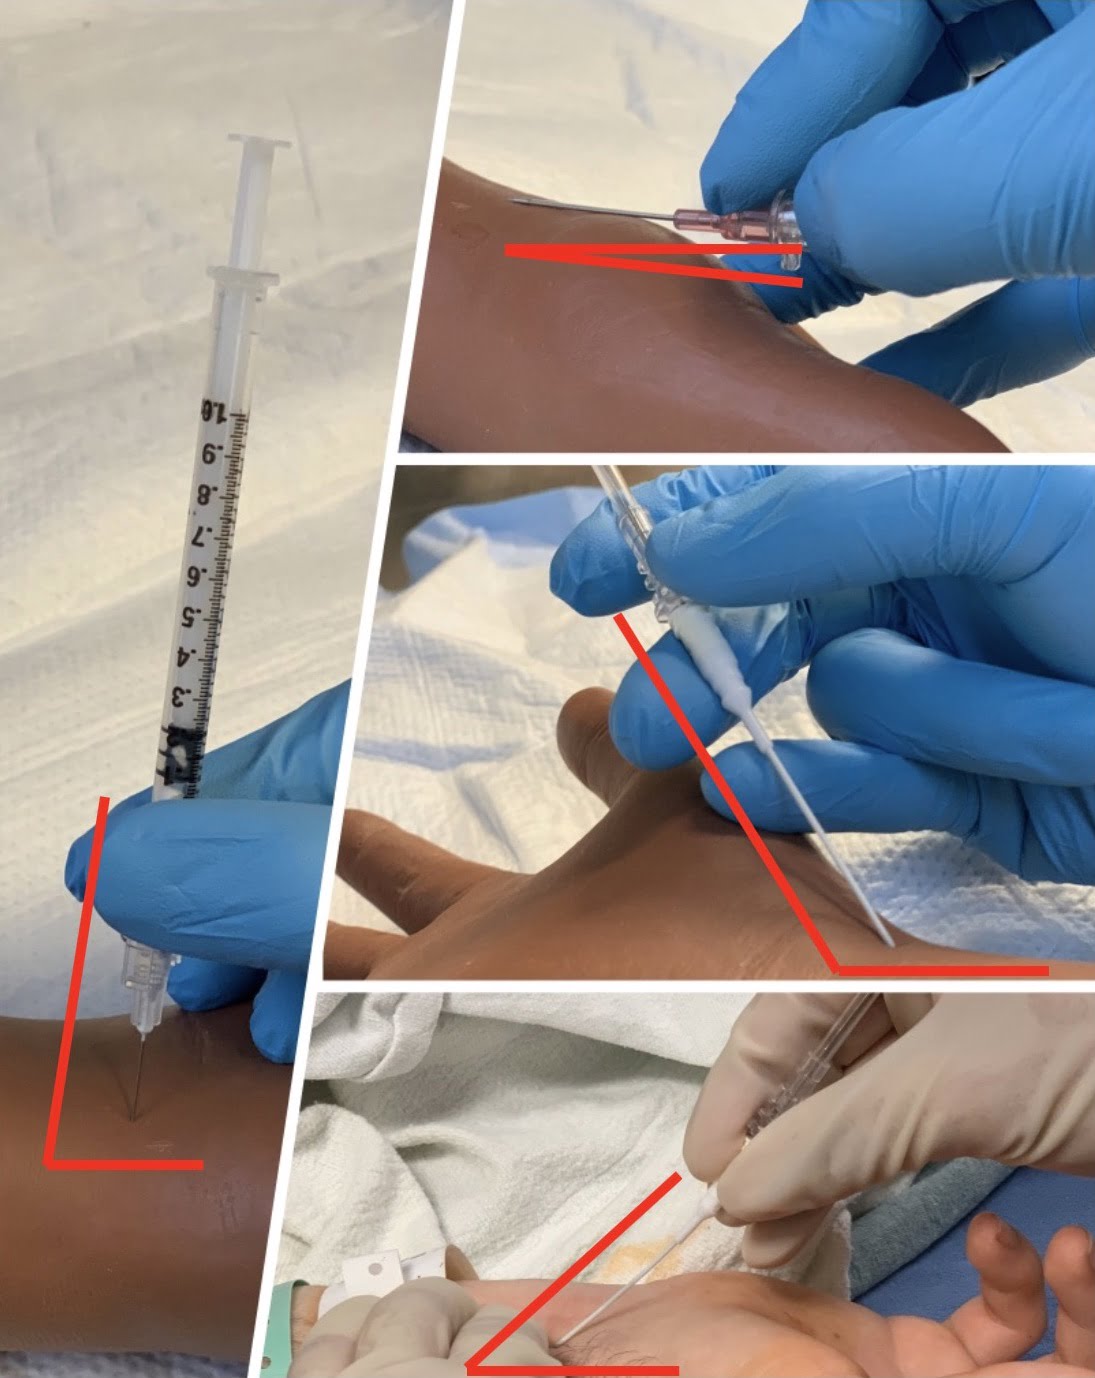
Figure 4: Here is a side-by-side view for comparison of the angles of the different techniques.

Figure 5: When using the first and third finger technique, stabilize the hand on the patient’s palm.

Figure 6: If using the pen handling technique, rest the medial aspect of your hand along the hypothenar eminence.

Figure 7: Secure the wire by suturing into the skin.
9. Point of care ultrasound (POCUS) technique
Many of the same principles apply, so we will focus on those specific to POCUS.
- Find your landmark:
- View the radial artery. You usually start at the distal wrist similar to above.
- Note the depth from the skin to the vessel and adjust the depth and gain of the machine to maximize visualization.
- Mark insertion site if desired.

- Prepare the site:
- Preparation remains key. Ensure that proper sterile precautions are taken when utilizing the US probe (ie sterile probe cover, sterile gel)
- Insert the line:
- Hold the probe in your non-dominant hand.
- (Microskill #6) Rest your hypothenar edge or 5th finger against the patient to stabilize your hand as it holds the probe.
- Hold the catheter with your dominant hand – angle of insertion starts similar to above.
- Out-of-plane approach:
- Hold the linear probe so that it is perpendicular to the artery and the artery runs through the midpoint of the probe.
- The pulsating circle of the artery should be in the middle of the screen.
- Insert the needle at the halfway point of the probe – which should be directly over the artery. Locate your needle tip near the skin.
- (Pro-tip #8) If you are are not directly over the artery, you will need to either change direction of your needle or remove the needle and start over at the skin surface.
- (Microskill #9) Chase the needle tip. Advance the probe – slide it a tiny bit up the arm until you are just past the needle tip. Then slowly advance the needle until it comes back into view. Keep doing this until you see your needle tip enter the artery.
- (Pro-tip #9) One of the main skills in ultrasound-guided vascular access is knowing where your needle tip is at all times. You can’t tell from the image if the 2D plane of the ultrasound is going through the tip, or further down the needle – both look like a bright dot on the screen. The only way you can tell is by advancing the probe until you see the image go past the needle and then either come back a little with the probe or advance the needle until you can see the needle tip again. If you can’t see your needle tip, you won’t see if it goes through the back wall of the artery.
- (Pro-tip #10) Once the needle reaches the wall of the artery, you might see the wall indent. If you apply sustained pressure eventually you will see that indent go away and the needle will go inside the artery.
- (Microskill #10) Once you see your needle tip inside the artery, lower the angle of insertion to a more shallow angle and advance the needle up the artery just a little bit (1 cm), keeping the tip in the centre of the artery. Now you are sure your needle is inside the vessel and can remove the needle and advance the cannula.
![]()
- In-plane approach:
- Hold the probe directly above and parallel to the artery so you can see the pulsating cylinder of the artery.
- (Pro-tip #12) Your needle insertion point should be at the midpoint of the width of the probe, and heading in exactly the same direction as the probe – the needle must be in the same plane as the ultrasound in order to be seen.
- (Microskill #10) If you can’t see your whole needle make small movements with the probe – sliding and rotation – until the whole needle is seen.
- (Microskill #11) Keeping the probe still, advance your needle keeping the whole length always in view until you see it enter the artery.

- Confirm the placement (2 ways):
- Visualize the needle tip inside the artery.
- Check for the presence of pulsatile blood when you remove the needle or internal wire.
- Secure the catheter (POCUS #5):
- (Pro-tip #13) Ensure sterile gel has been completely removed from the insertion site – otherwise the dressing won’t stick. Then secure the catheter as above.
Why does Just-in-Time Training Work?
Just-in-time training (JITT) is a model that was initially applied in the manufacturing sector and was credited with increasing productivity and efficiency while eliminating waste. JITT provides learners with the right material, at the right time, and in the right place. JITT can take many forms (eg, video, blog post, quick instruction cards) and involves a short refresher on pertinent information just prior to performing in a high-stakes clinical scenario. The topic has been studied and shown to increase a layperson’s ability to successfully apply a tourniquet,1 as well as improve ED physicians’ performance with placing a transvenous pacemaker.2
Consider this the next time you are supervising a resident who is attempting to place an arterial line. How can you apply JITT? Do you have a favorite video you could review before the procedure? Could you use this blog post of microskills, pro-tips, and common pitfalls?
Procedural skills are not easy to teach as they require mastery of technical skills that need repetitive practice, and are more challenging to articulate than demonstrate. However, by breaking down the procedure into microskills and quickly reviewing critical actions, successful completion and mastery can eventually be attained.
Case Conclusion
You spend a few minutes reviewing the step-by-step outline for radial arterial line placement. Mentally, you walk through the procedure and identify the microskills you have struggled with in previous failed attempts. You decide you are ready to place the radial arterial line. With the steps fresh in your mind, you successfully place the arterial line and are able to monitor your patient and better titrate his antihypertensive drips. You have earned respect points from both the nurses and your attending for how effortless you made the procedure look. Well done!
Useful Links
- Ailon J, et al. Ultrasound guided insertion of a radial arterial catheter. New England Journal of Medicine. Published on Oct 9, 2014.
- Collins A. Ultrasound guided radial artery line insertion; Instructional Video. UCSF Department of Anesthesia and Critical Care. Published on Feb 12, 2013. Available here
- Sonosite Ultrasound. 3D How to: Ultrasound guided radial artery catheterization (Trans). 2011.
- Tegtmeyer K, et al. Placement of an arterial Line. New England Journal of Medicine. Published on Apr 13, 2006.
- Weingart S. EMCrit Podcast 210 – Arterial Lines (Part 1). EMCrit Blog. Published on October 16, 2017.
Photo credit:
Al’ai Alvarez, MD and Rob Cooney, MD
Blog post edited and curated by:
Mark Ramzy, DO
Faculty Incubator Multimedia and Communications Editor
References:
- Goolsby C, et al. Just-in-Time to Save Lives: A Pilot Study of Layperson Tourniquet Application. AEM 2015; PMID: 26302453
- Branzetti JB, et al. Randomised controlled trial to assess the effect of a Just-in-Time training on procedural performance: a proof-of-concept study to address procedural skill decay. BMJ Qual Saf 2017; PMID: 28866621

Al'ai Alvarez, MD
Clinical Associate Professor
Director of Well-being
Co-Chair, The Human Potential Team
Department of Emergency Medicine
Stanford University School of Medicine
Latest posts by Al'ai Alvarez, MD (see all)
- Trick of the Trade: Managing Epistaxis with Merocel Nasal Packing and an Angiocatheter - November 11, 2022
- How I Work Smarter: Al’ai Alvarez MD - January 21, 2022
- Trick of the Trade: Persistent Paracentesis Leakage 2.0 - October 20, 2021

Brian Barbas, MD
Department of Emergency Medicine
Loyola University Chicago – Stritch School of Medicine
Latest posts by Brian Barbas, MD (see all)
- Banishing Busy: Part 3 - July 17, 2020
- Banishing Busy: Part 2 - July 3, 2020
- Banishing Busy: Part 1 - June 26, 2020

Eric Blazar, MD
Department of Emergency Medicine
Rowan University
Inspira Medical Center
Latest posts by Eric Blazar, MD (see all)
- Improving Your ED Efficiency: Upgrade This Elusive Skill - December 17, 2021
- Banishing Busy: Part 3 - July 17, 2020
- Banishing Busy: Part 2 - July 3, 2020

Leon Melnitsky, DO
Department of Emergency Medicine
Memorial Health System, Pembroke Pines, Florida.
Latest posts by Leon Melnitsky, DO (see all)
- Just-in-Time Training for Emergency Medicine Radial Arterial Line Placement - November 15, 2019

Sonia Twigg, FACEM, MBBS
Department of Emergency Medicine
Queensland Children’s Hospital, South Brisbane, Australia
Latest posts by Sonia Twigg, FACEM, MBBS (see all)
- Just-in-Time Training for Emergency Medicine Radial Arterial Line Placement - November 15, 2019

Meenal Sharkey, MD
Assistant Program Director
Department of Emergency Medicine
Doctors Hospital, Columbus, OH
Latest posts by Meenal Sharkey, MD (see all)
- How I Work Smarter: Meenal Sharkey, MD - September 18, 2020
- Banishing Busy: Part 3 - July 17, 2020
- Banishing Busy: Part 2 - July 3, 2020

Krystin Miller, MD
Department of Emergency Medicine
The Ohio State University, Columbus, OH
Latest posts by Krystin Miller, MD (see all)
- Just-in-Time Training for Emergency Medicine Radial Arterial Line Placement - November 15, 2019


