Trick of the Trade: Getting the last bit of ultrasound gel from the bottle
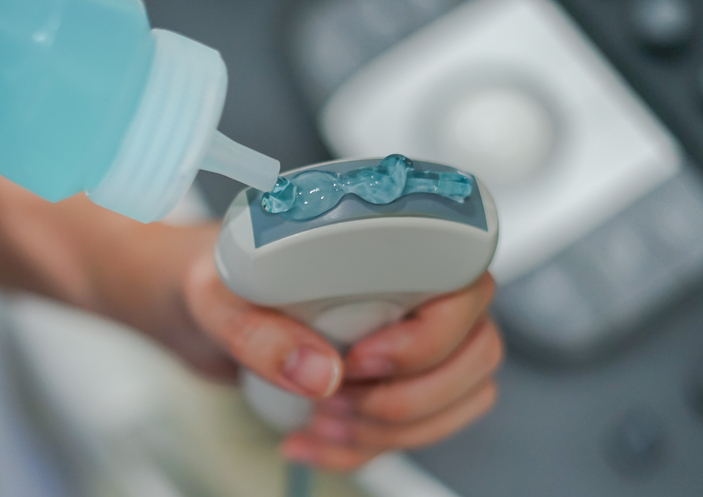
It’s a busy shift and you need to perform a bedside ultrasound on a patient’s belly to rule out cholecystitis, when you realize that the ultrasound gel bottle is nearly empty. No matter how many times you vigorously shake the bottle, it’s impossible to get the viscous gel out. In a pinch, you could use hand sanitizer, sterile lubricant, or even water as a substitute for gel. Or you could run to the storage room on the other side of the busy department to grab a new bottle. Or…

Trick of the Trade

Use centrifugal force to move the gel to the top of the bottle!

trick ultrasound bottle gel out


  • Turn the bottle upside down so the cap is facing the ground.
  • Place the bottle into a (fresh) patient’s sock or transducer cover. Alternatively, you can use a plastic bag or ortho tubular stockinette.
  • Firmly holding the bag, and spin the bag for a few seconds in a circular motion, almost like you were throwing a grappling hook.
  • The centrifugal motion will generate an outward force pushing all of the viscous gel to the bottle cap!
  • Once you’ve used the gel, store the bottle cap-side down so you don’t have to do this again.

This trick is useful in a pinch, because it makes use of the entire gel bottle and promotes an eco-friendly use of ED resources.

Tip: Just don’t let go while you swing, lest you turn that patient with the belly pain into a trauma activation from a bottle to the face.

Interest in other tricks?

Read more articles in the Tricks of the Trade series.

By |2022-07-25T11:26:09-07:00Jul 27, 2022|Tricks of the Trade, Ultrasound|

Trick of the Trade: A “Fiberbougie” through a supraglottic airway device (King tube)

king tubeResuscitation before intubation is a critical construct in modern emergency medicine. The prevention of peri-intubation arrest by correcting pre-intubation hypoxia, hypotension, and acidosis is often easier said than done. Worse yet, the intubation process itself, especially if difficult, can worsen hypoxia and hypotension which is often unrecoverable [1, 2] Supraglottic devices, such as a King Airway or laryngeal mask airway, can be placed quickly, and they effectively oxygenate and ventilate patients with a high degree of success [3]. Unfortunately, when the King (or similar device) is exchanged for an endotracheal tube, success is far from guaranteed. Ideally the King could be blindly changed over a tube exchanger however it is quite easy to lose the airway completely during this process. We describe a potentially safer and more effective alternative.

Trick of the Trade

After a patient is stabilized after initial resuscitation, the supraglottic King airway device should be exchanged. A disposable, single-patient-use bronchoscope can serve as a bougie-like guide.

equipment fiberbougie king

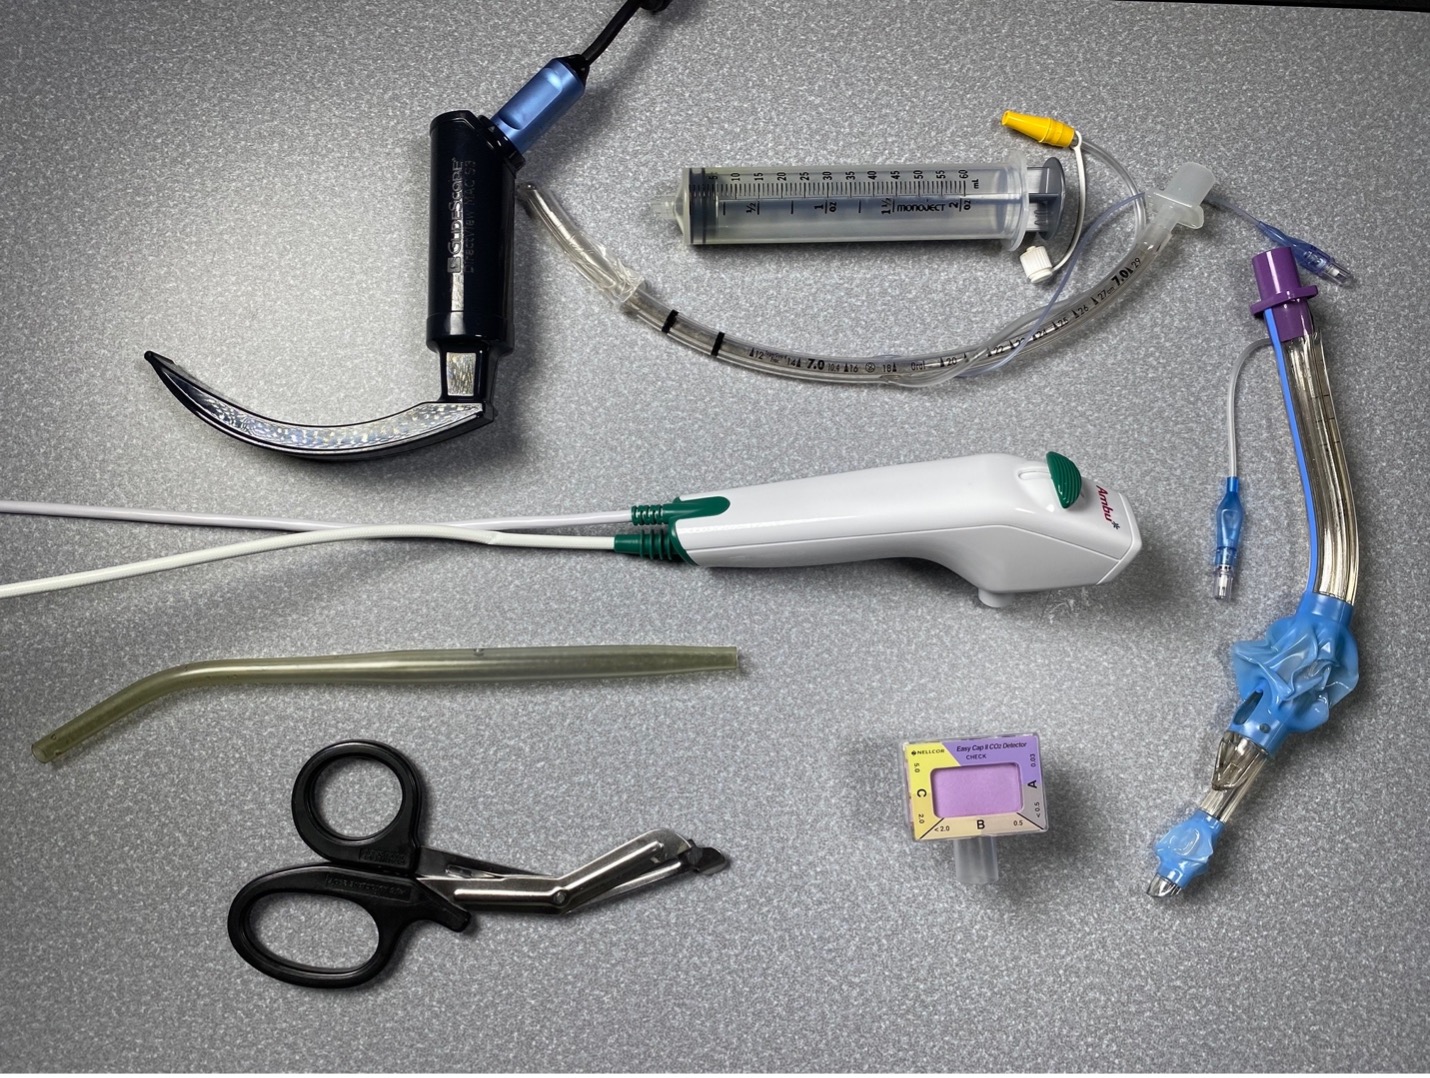
Equipment Needed

  • Disposable bronchoscope
  • Endotracheal tube
  • 50 mL syringe
  • Laryngoscope (video or direct)
  • Trauma shears
  • Suction
  • Capnography
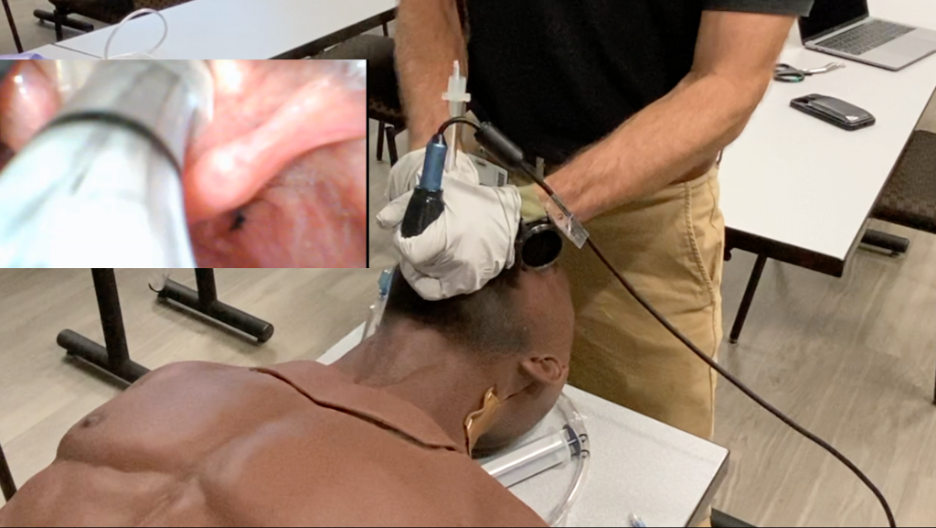
fiberbougie through supraglottic device king airway

Left: Demonstrating the technique inserting a single-use bronchoscope through a supraglottic King tube in a simulation patient. Right: Corresponding view of the vocal cords through the King side port in a real patient.

Description of the Trick

  1. Insert a disposable bronchoscope through the airway port of the King airway
  2. Guide the bronchoscope to exit through the side port of the King and into the trachea until you approach the carina
  3. Cut the disposable bronchoscope at the level of the handle, leaving a “fiberbougie” in the trachea above the carina
  4. Remove the King airway over the cut fiberscope in a modified Seldinger technique while suctioning airway
  5. Insert the endotracheal tube over the “fiberbougie”
  6. Use video or direct laryngoscopy to visualize the tube sliding over the “fiberbougie” into cords
  7. Confirm placement with capnography and/or with direct visualization and x-ray
bronch bougie equipment

Insertion of the endotracheal tube over the “fiberbougie” with video laryngoscopy confirmation with a simulation patient. The inset image was captured from a Glidescope on a real patient during the exchange.


Video Tutorial of the Fiberbougie Technique to Exchange a King Tube


References

  1. April MD, Arana A, Reynolds JC, et al. Peri-intubation cardiac arrest in the Emergency Department: A National Emergency Airway Registry (NEAR) study. Resuscitation. 2021;162:403-411. doi:10.1016/j.resuscitation.2021.02.039. PMID 33684505
  2. Russotto V, Tassistro E, Myatra SN, et al. Peri-intubation Cardiovascular Collapse in Critically Ill Patients: Insights from the INTUBE Study [published online ahead of print, 2022 May 10]. Am J Respir Crit Care Med. 2022. doi:10.1164/rccm.202111-2575OC. PMID 35536310
  3. Burns JB Jr, Branson R, Barnes SL, Tsuei BJ. Emergency airway placement by EMS providers: comparison between the King LT supralaryngeal airway and endotracheal intubation. Prehosp Disaster Med. 2010;25(1):92-95. doi:10.1017/s1049023x00007743. PMID 20405470 

Trick of the Trade: Don’t fight the ultrasound cord for peripheral IV access

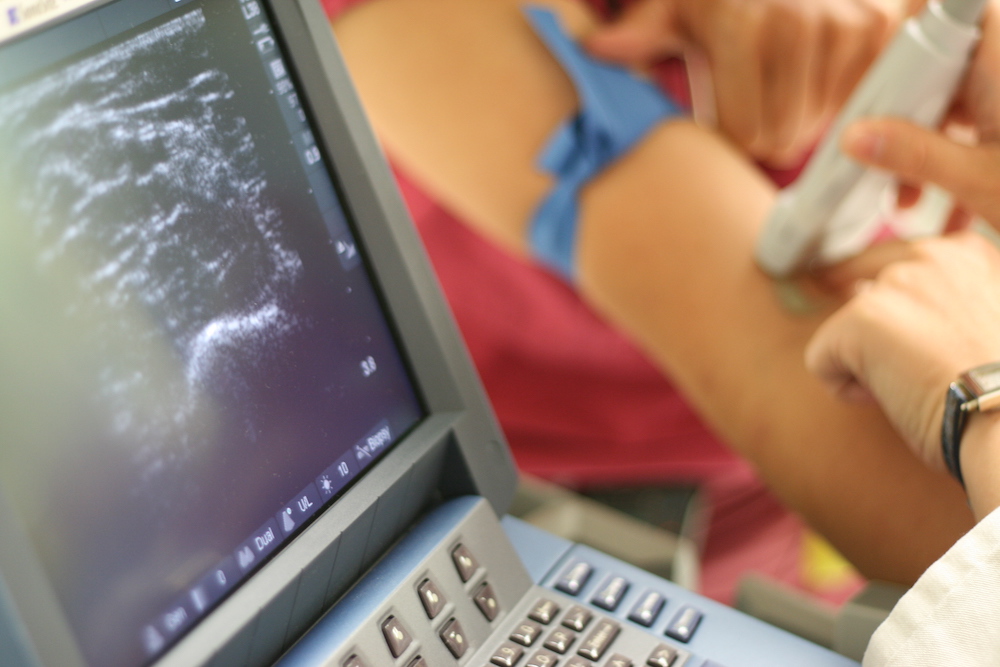
ultrasound POCUS peripheral iv trick

Ultrasound-guided IVs require hand-eye coordination and fine movements of probe in Goldilocks fashion. Apply too much pressure, and the vein in question is compressed. Slide a little to the right, and now it’s out of the window. Something that practitioners don’t think about is the tension from the cord. If left to its own devices, the cord will tug on the probe, making the probe harder to steer and handle, especially for those tiny veins.

Trick of the Trade: Reduce cord tension

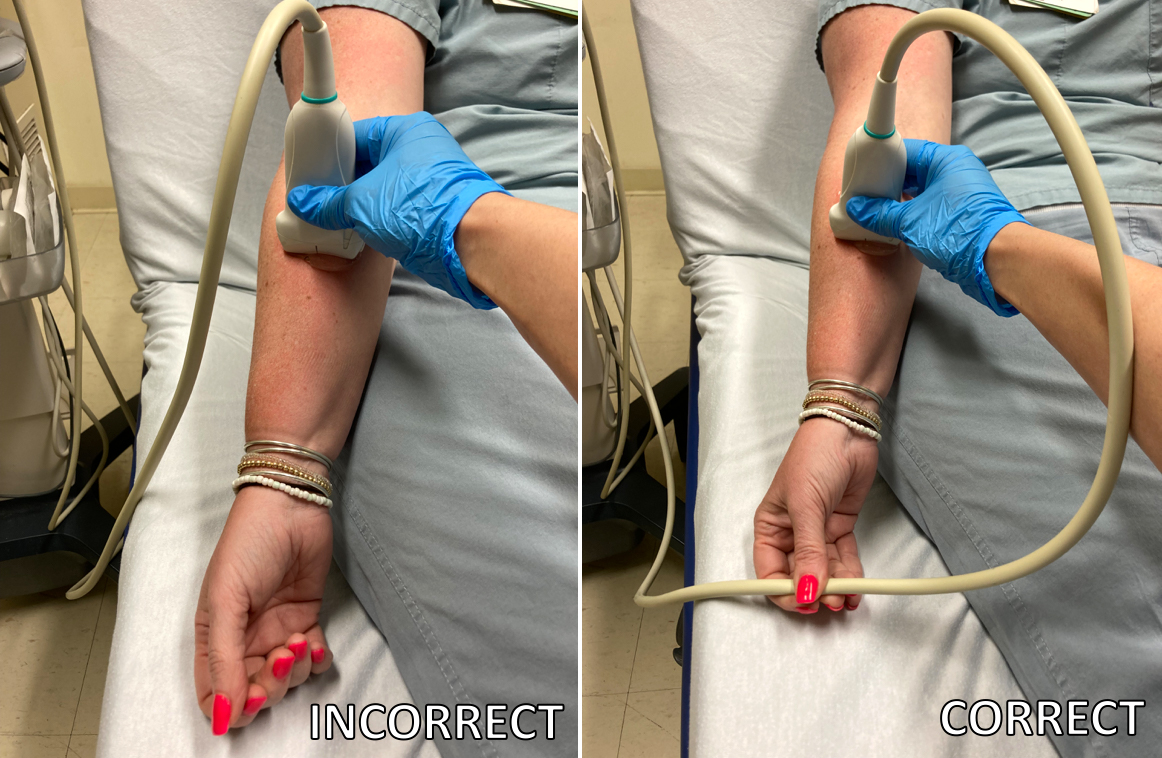
Have the patient grasp the cord!

This makes them an active participant. Usually, if they are awake and good-humored, tell them “audience participation is required.” Doing so will give you enough slack to effectively visualize and troubleshoot the ultrasound-guided IV.

ultrasound cord trick POCUS


What if the patient is intubated, or altered, doesn’t quite grasp, or can’t handle the situation?

Tape the cord to the gurney side rail. Use a 2×2 gauze as a buffer between the tape and the rail so the tape doesn’t damage the cord itself.

ultrasound cord POCUS tape


Want to learn other tricks?

Read other articles in the Tricks of the Trade series.
By |2022-05-31T00:37:48-07:00Jun 3, 2022|Tricks of the Trade, Ultrasound|

Trick of the Trade: DIY Nasal Snot Aspirator

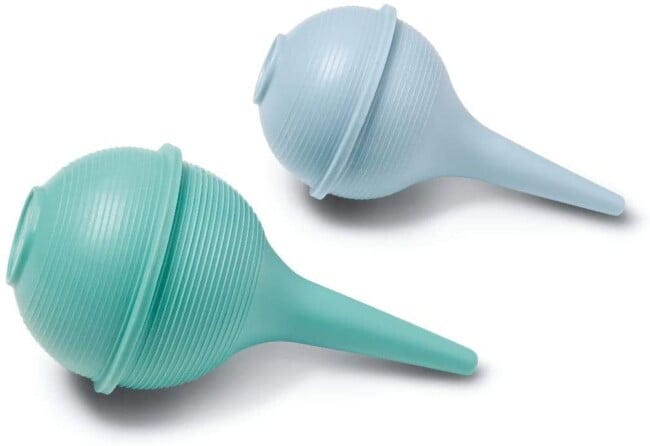
nasal bulb suction

Nasal congestion is a common symptom of upper respiratory tract infections, such as bronchiolitis, in newborns and infants. Because newborns are obligate nose breathers, any congestion presents a challenge during feeding and sleeping. These infants become frustrated when they cannot breathe while feeding and tend to have disturbed sleep when their nasal passages are occluded. This often leads to dehydration and irritability. Although the infant bulb syringe (above) can often alleviate the congestion, other commercial products may be able to more forcefully clean out the nasal mucus (e.g., NoseFrida, Bubzi Nasal Aspirator).

Trick of the Trade: DIY Nasal Snot Aspirator

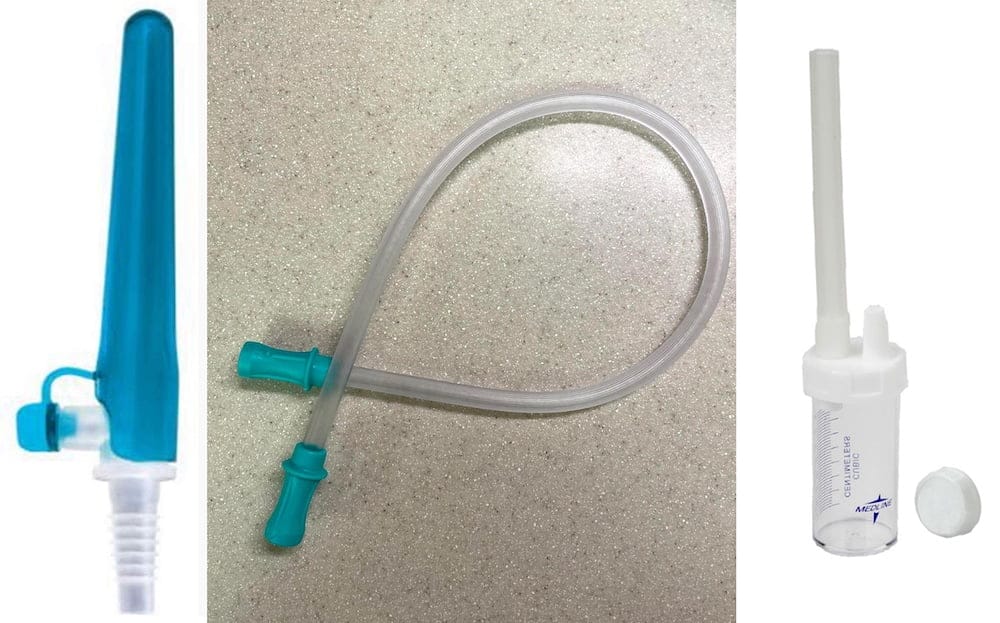
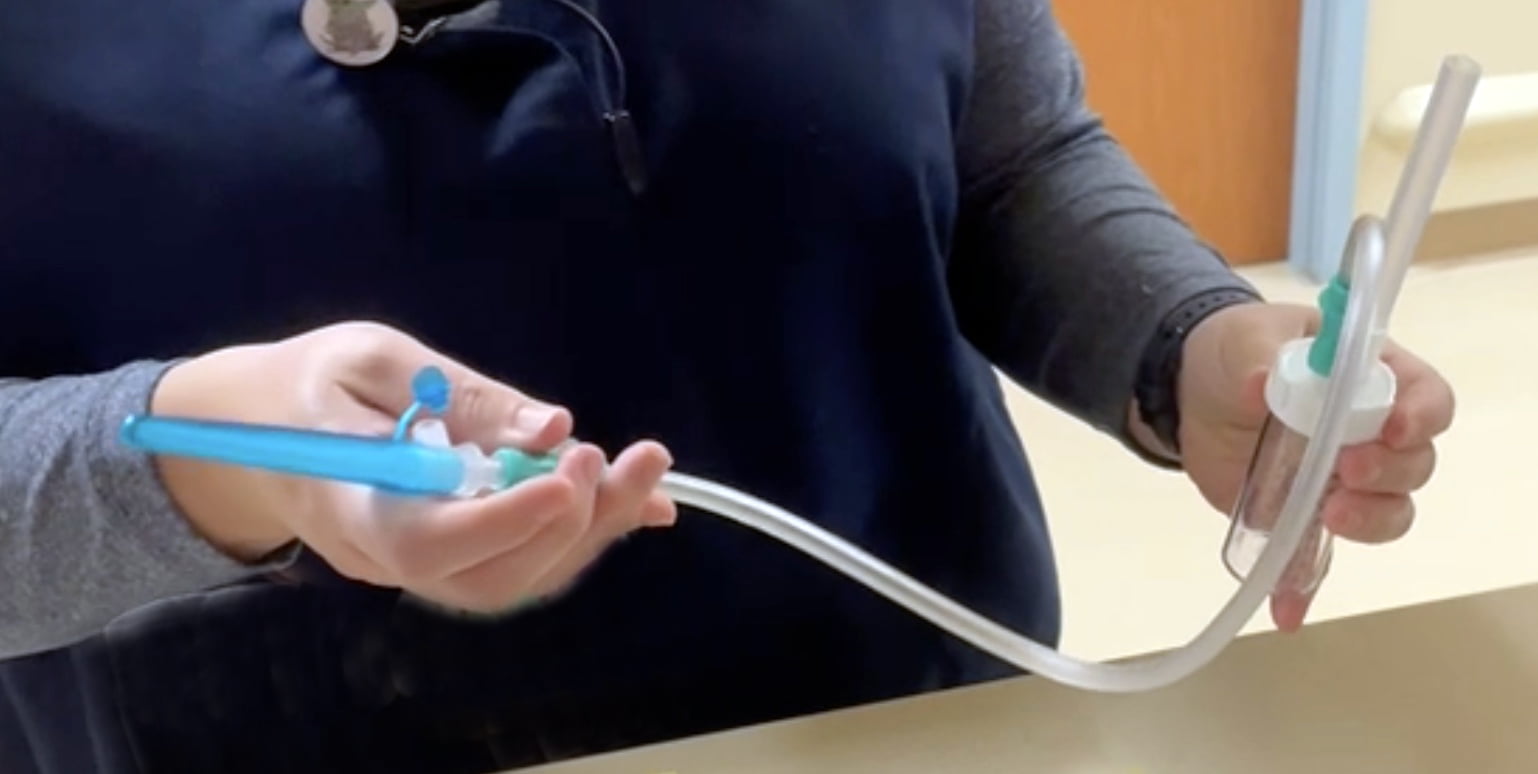
In the Emergency Department, you may encounter families who may not have the resources to purchase or be aware of commercial aspiration devices for children. The concept behind our DIY Nasal Snot Aspirator is to allow the caregiver to suction the child’s nose using the negative pressure generated from the caregiver’s own mouth. The left video demonstrates how the NoseFrida works, and the right video demonstrates our DIY Nasal Snot Aspirator. Note that the specimen trap serves as the protective “filter”, or barrier, between the child’s suctioned mucus and the caregiver’s mouth. Thanks to Stephany Landry, RN, BSN for sharing this trick of the trade.

Equipment Needed: DIY nasal snot aspirator

  1. Left: Little Sucker Aspirator [Amazon]
  2. Middle: Short suction tubing
  3. Right: Mucous specimen trap, 40 cc [Amazon]
DIY Nasal Snot Aspirator equipment

Description of the Trick

  1. Suction tubing: Attach one end to the Little Sucker Aspirator and the other end to the short connector port on the specimen trap.
  2. Instill some saline drops into the child’s nose.
  3. Insert the aspirator tip of your contraption into the child’s nostril.
  4. Have the caregiver suck out through the “straw” attached on top of the specimen trap.
trick DIY nasal snot aspirator
DIY Nasal Snot Aspirator, demonstrated by Stephany Landry, RN, BSN

Disclosures

The authors and ALiEM do not have any affiliation with any of these device companies.

By |2022-01-21T01:18:17-08:00Jan 26, 2022|HEENT, Pediatrics, Tricks of the Trade|

Trick of Trade: Large-Bore Endotracheal Tube To Suction the Occluded Airway

vomit suction emesis pumpkin

The paramedics just arrived with a new patient to the resuscitation room. You find an altered patient actively vomiting bloody vomitus and food particles. You prepare for a difficult airway. You prepare 2 Yankauer suction catheters, but you are still worried that the food particles may clog up the catheters. Is there a better alternative?

Background

Up to 44% of emergent intubations are complicated by blood, vomit, or food particles in the airway. It has been shown that contaminated airways may lead to multiple intubation attempts and are associated with poor outcomes, such as peri-intubation cardiac arrest [1, 2].

The Yankauer suction catheter is the most commonly available tool in the Emergency Department to remove foreign particles, but performs poorly when compared to larger-bore catheters [3]. The Yankauer was made initially for surgical field management, with small holes at the tip to gently remove (or become clogged with) debris without damaging tissue. Some standard Yankauer designs have a built-in safety vent hole on the shaft, which if unoccluded, renders the device virtually useless [2]. This protective equipment design does not offer maximum help during emergent large-volume regurgitation dirty airway management.

Alternatively, there is the DuCanto suction catheter. It is a specialized and more expensive large-bore version of the Yankauer; however, it is not as readily available and more expensive [1].

Trick of the Trade: Use a large-bore endotracheal tube as a rigid suction catheter

A large-bore, such as a size 10.0, endotracheal tube can serve as a rigid suction catheter. Note the diameter sizes of the Yankauer, DuCanto, and 10.0 endotracheal tube below.

Suction devices (inner diameter):
Yankauer (3.56 mm), DuCanto (6.6 mm), 10.0 endotracheal tube (10 mm)
  • Materials needed
    1. Size 10.0 endotracheal tube (or the largest size you have)
    2. Suction tubing and canister
  • Making the device
    1. Insert the rubber end of the suction tubing over the plastic endotracheal tube adaptor
    2. Attach suction tubing to the canister
    3. Turn suction on

Video Demonstration: Yankauer vs Large-Bore Endotracheal Tube

Editorial Note: If the rigidity of the catheter is less important, you can also insert the soft suction tubing directly into the airway to remove contents.

Read other Tricks of the Trade posts on ALiEM.

References:

  1. Nikolla DA, Heslin A, King B, Carlson JN. Comparison of suction rates between a standard Yankauer and make-shift large bore suction catheters using a meconium aspirator and various sized endotracheal tubes. J Clin Anesth. 2021 Sep;72:110262. doi: 10.1016/j.jclinane.2021.110262. PMID 33839435
  2. Hasegawa K, Shigemitsu K, Hagiwara Y, et al. Association between repeated intubation attempts and adverse events in emergency departments: an analysis of a multicenter prospective observational study. Ann Emerg Med. 2012;60(6):749-754.e2. doi:10.1016/j.annemergmed.2012.04.005. PMID 22542734
  3. Andreae MC, Cox RD, Shy BD, et al. 319 Yankauer Outperformed by Alternative Suction Devices in Evacuation of Simulated Emesis.” Ann Emerg Med. 68(4), S123 [research abstract] doi: 10.1016/j.annemergmed.2016.08.335
By |2021-10-29T19:15:35-07:00Oct 31, 2021|Critical Care/ Resus, Tricks of the Trade|

Trick of the Trade: Persistent Paracentesis Leakage 2.0

Paracentesis leakage

You’re seeing a patient returning to the ED after a recent diagnostic paracentesis. The patient is complaining of persistent peritoneal fluid leakage. They’ve tried putting pressure with no success. You tried applying a medical adhesive glue and noticed it was unsuccessful, based on the patient’s gown continuing to get wet with ascites fluid. Now what?

Trick of the Trade: Pressure Gauze and Transparent Film Dressing  

The medical adhesive glue trick was proposed in the Trick of the Trade 1.0 version by Dr. Borloz and Dr. Lin in November 2012. 

Materials Needed

MaterialQuantity
Benzoin tincture1
Gauze 2″ x 2″1-2
Transparent Film Dressing (Tegaderm) 2.5″ x 2.75″3-4

Technique

1. Apply benzoin tincture surrounding the area of the leakage.
gauze ball in hand
2. Use a 2″ x 2″ gauze and roll it into a tight round ball. Hold the gauze with firm pressure over the leak (it is easier if you have the patient or an assistant holding it in place while you move on to the next step).
4. Stretch the transparent film dressing before placing it over the center of the gauze
4. Continue to hold firm pressure on the gauze from over the transparent film dressing. Note that you are not yet touching the dressing against the skin.
5. Stretch out transparent film dressing and affix to the patient’s skin.
6. Once you apply the initial transparent film dressing, you can apply 2-3 more over the top, in the same fashion, to increase the pressure on and security of the dressing. Patients may be discharged with this dressing in place for 24-48 hours.

Pro Tip

Consider combining both this trick of the trade and the adhesive glue technique. Hat tip to Dr. Christian Rose [Twitter @RoseLikeTheFlwr] for this idea. 

Interested in other Tricks of the Trade posts?

Read the series of Tricks of the Trade posts.

By |2021-10-15T12:48:11-07:00Oct 20, 2021|Gastrointestinal, Tricks of the Trade|

Trick of the Trade: Upsize the IV with the tourniquet infusion technique

peripheral iv catheterThere you are, middle of the night and EMS just brought you one of the sickest of the sick: a septic-looking, chronically ill-appearing, frail, and malnourished patient with low blood pressures. They need vascular access for fluids, antibiotics, and possibly even vasopressors. The patient arrives with only a 22-gauge peripheral IV in the hand. You ask for two large bore IVs. But unfortunately, your best nurses and techs can’t find a vein, and their initial attempts are unsuccessful. Do you move right towards ultrasound-guided placement, intraosseous needle, or a central line? What if the patient only needs a fluid bolus, antibiotics, and admission to the floor?

Trick of the Trade: Tourniquet infusion technique

The tourniquet-infusion technique provides a method to increase the chance of a successfully placed larger bore peripheral IV in the volume-depleted patient.

Technique

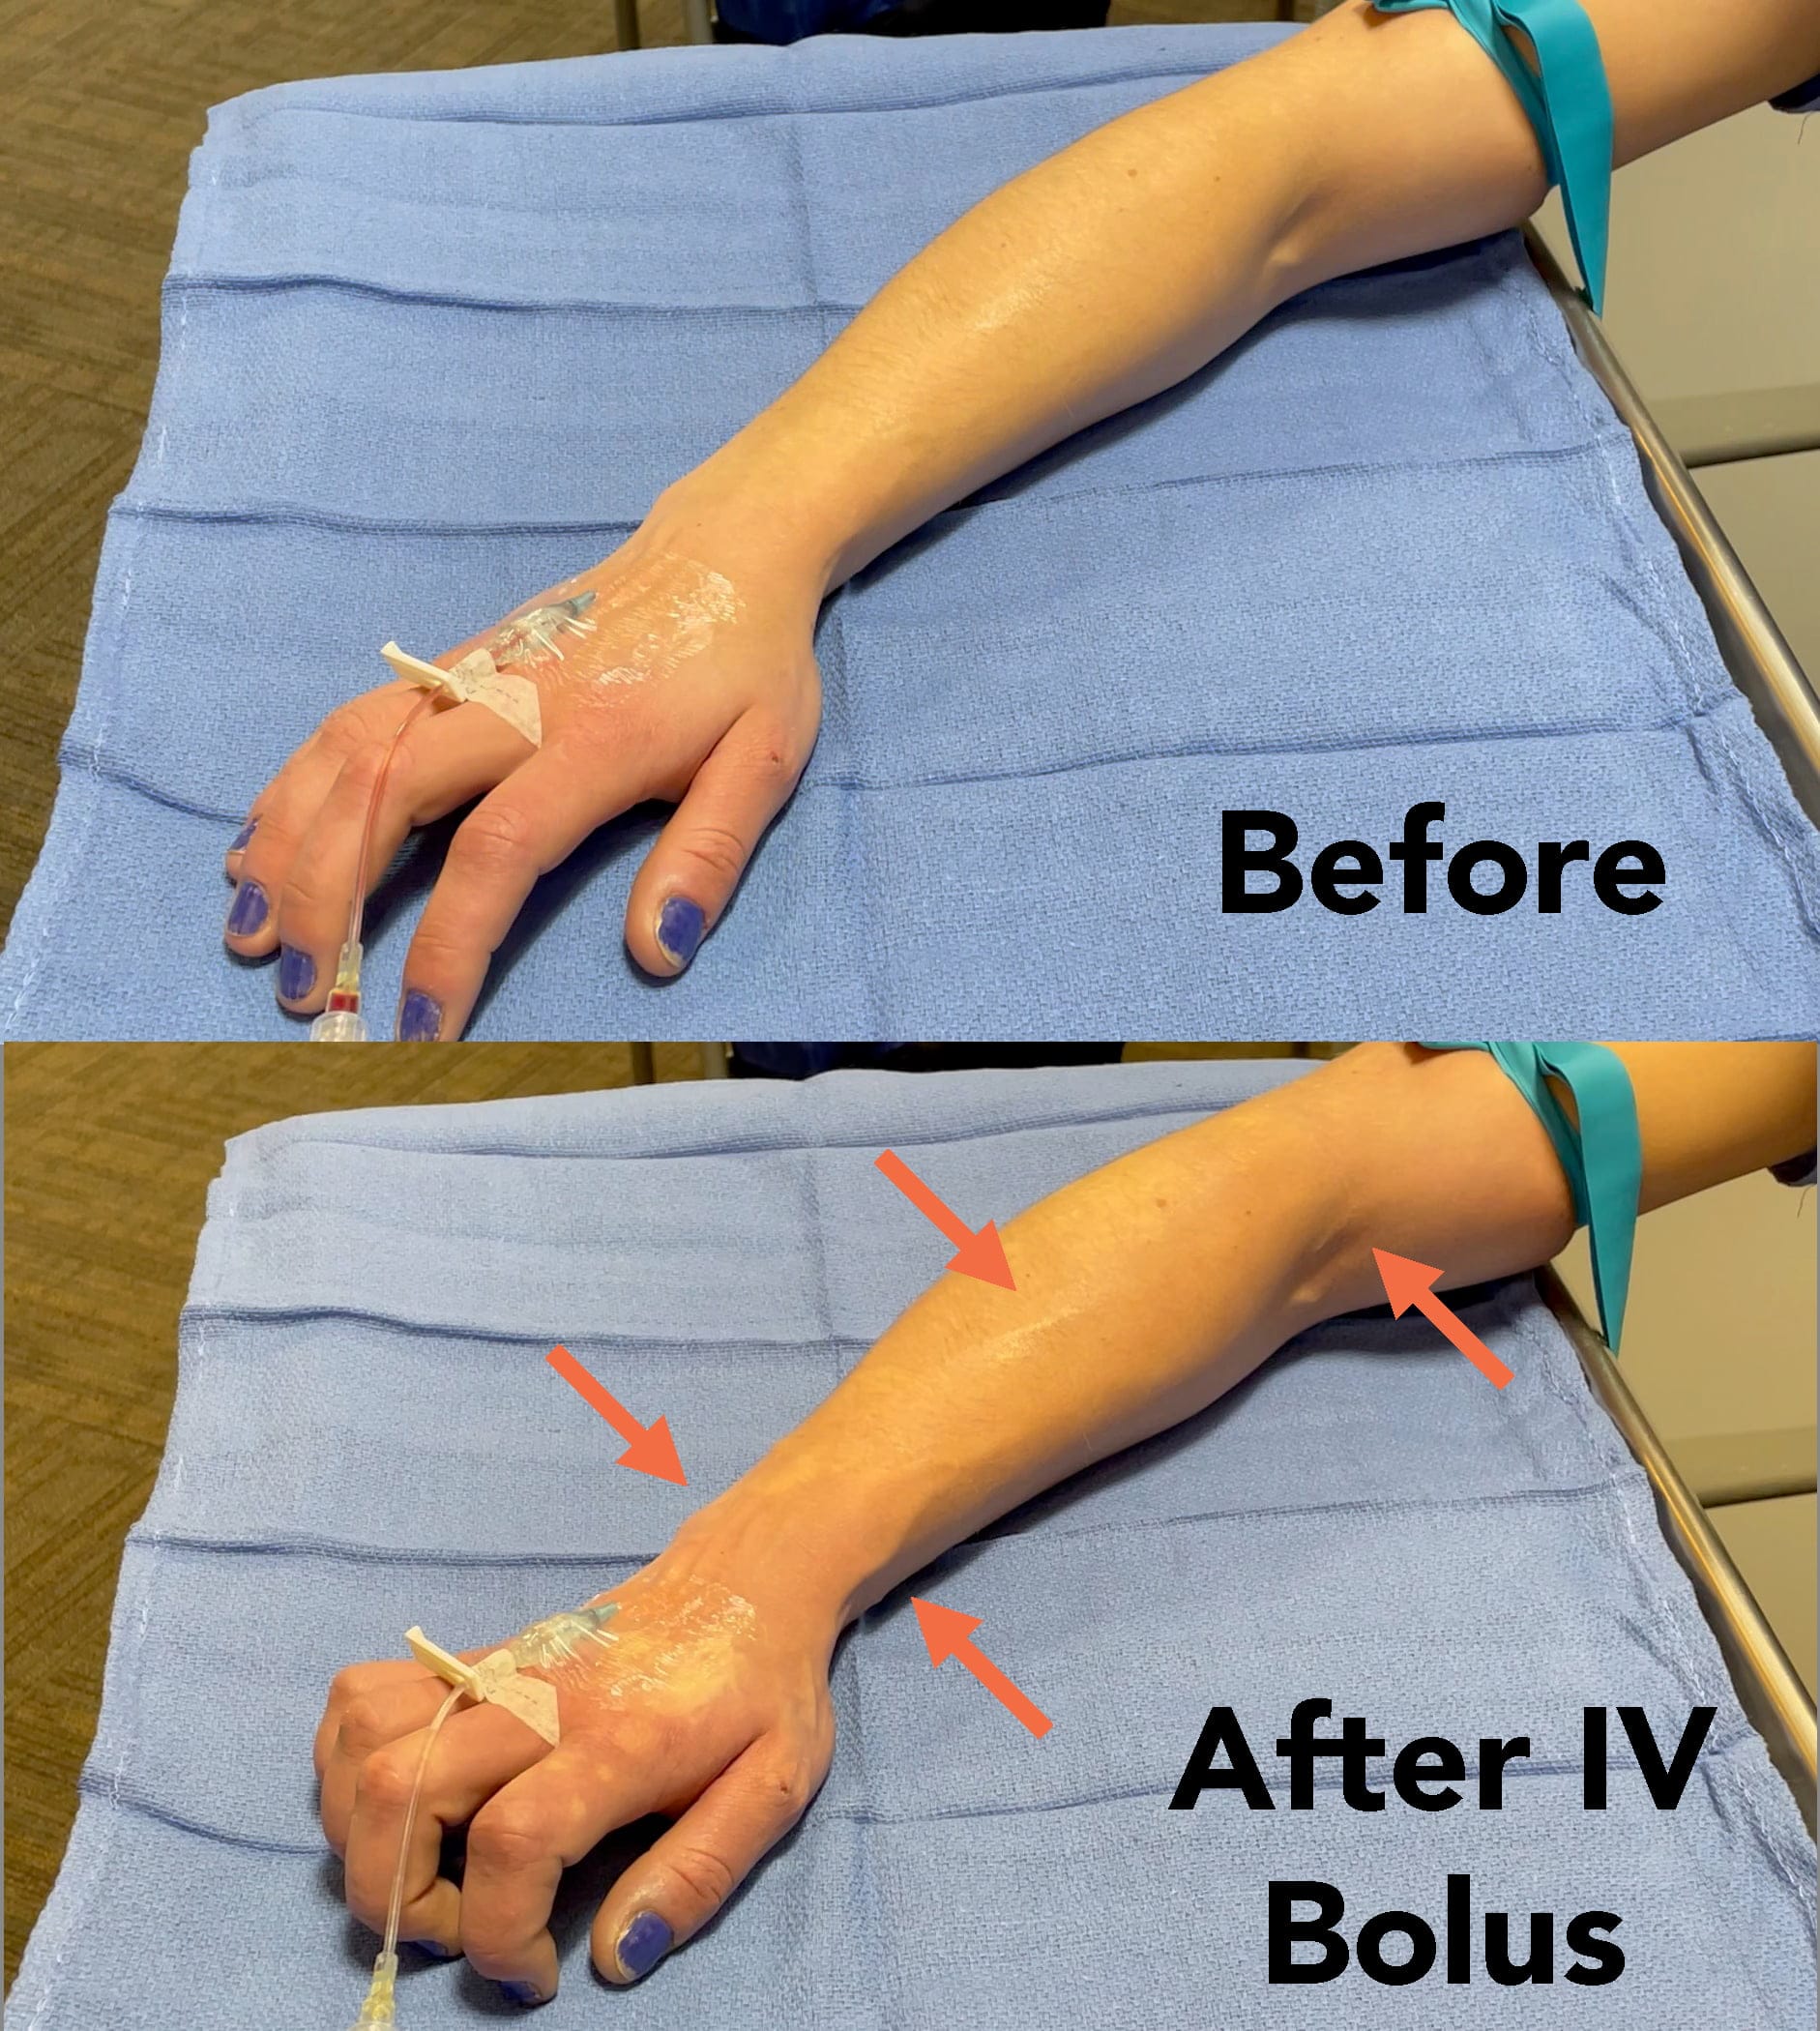
  1. Apply a tourniquet to the extremity, proximal to the existing smaller-gauge IV access site.
  2. Rapidly infuse 50-100 mL of IV fluids, causing distension of the venous system between the IV and the tourniquet. This distension creates a larger target for venous cannulation in volume-depleted patients.

trick tourniquet infusion technique dilate upsizing vein arm peripheral IV

Tourniquet Infusion Technique: After applying a tourniquet and instillation of an IV bolus of fluids through a small distal 22-gauge IV, large veins are more visible for a second larger-bore IV


Discussion

This technique has been described in the literature for decades [1-3], and has been anecdotally successful in clinical practice. Its methodology capitalizes on pre-existing or easily-placed distal small gauge access (i.e., a 22g IV in the hand) as a stepping stone to larger venous cannulation.

Quinn and Sheikh investigated the employment of this technique for 22 adult patients with an acute abdomen who had been referred from the ED in hypovolemic shock. A peripheral IV had not been obtained in any of these patients using standard cannulation methods. By employing this tourniquet-infusion technique to upsize the IVs, they were able to successfully obtain adequate access for resuscitation in 15 of the 22 patients (68%). They noted no complications secondary to this technique. The authors noted that of the other 7 patients in this small study, 2 died and 5 required ultrasound-guided IJ venous line placement. In total, 15 patients were potentially spared unnecessary central venous catheterization. This technique is a simple, quick, and effective way of establishing a more appropriate line for resuscitation of sicker patients [1].

Pearls

  • For large-bore antecubital IV placement, consider placing a tourniquet in close proximity and just proximal to the elbow joint.
  • Consider the patient’s cardiac and pulmonary history to ensure that an additional fluid bolus is clinically appropriate.

References

  1. Stein JI. A new technique for obtaining large-bore peripheral intravenous access. Anesthesiology. 2005 Sep;103(3):670. doi: 10.1097/00000542-200509000-00041. PMID: 16130004.
  2. Quinn LM, Sheikh A. Establishing intravenous access in an emergency situation. Emerg Med J. 2014 Jul;31(7):593. doi: 10.1136/emermed-2012-202106. Epub 2013 Jun 15. PMID: 23771897.
  3. Williams DJ, Bayliss R, Hinchliffe R. Surgical technique. Intravenous access: obtaining large-bore access in the shocked patient. Ann R Coll Surg Engl. 1997 Nov;79(6):466. PMID: 9422881; PMCID: PMC2502954.
By |2021-05-30T23:44:23-07:00May 31, 2021|Critical Care/ Resus, Tricks of the Trade|
Go to Top