ACMT Toxicology Visual Pearl: Out of the Blue

Exposure to which of the following could produce the pictured results?
- Carbon monoxide
- Lead paint
- Morphine
- Oral analgesic gel

Exposure to which of the following could produce the pictured results?

A 64-year-old female with a history of quadriplegia and bladder rupture secondary to a motor vehicle accident two years ago, complicated by chronic indwelling suprapubic foley, presents from her skilled nursing facility with fever, oliguria, tachycardia, low blood pressure, and a change in the color of her urine.
Read this tutorial on the use of point of care ultrasonography (POCUS) for pediatric lung ultrasound. Then test your skills on the ALiEMU course page to receive your PEM POCUS badge worth 2 hours of ALiEMU course credit.
A 6-year-old boy presents to the emergency department complaining of cough for 3 days and fever for the last day. His fever was 103°F this morning and he received ibuprofen. He has also had abdominal and back pain. He was seen at the emergency department earlier in the day where he had a chest X-ray 6 hours prior that was interpreted as negative for consolidation and bloodwork including a complete blood count and comprehensive metabolic panel that were within normal limits. He presents with persistent cough and fever and now has increased work of breathing.
On arrival, his vital signs are:
| Vital Sign | Finding |
|---|---|
| Temperature | 99.7 F |
| Heart Rate | 138 bpm |
| Blood Pressure | 102/61 |
| Respiratory Rate | 32 |
| Oxygen Saturation (room air) | 100% |
He is well appearing but has increased work of breathing. His lungs have decreased breath sounds and crackles over the left lung base. No wheezes are appreciated. He has mild subcostal retractions. His abdomen is soft, non-tender, and non-distended. His back is non-tender to palpation. He has normal HEENT, neck, and cardiac examinations, with the exception of tachycardia as above.
Given his presenting signs and symptoms in the setting of a recent chest X-ray that was interpreted as normal, you decide to perform a lung point-of-care ultrasound (POCUS) examination.
![]()
Lung POCUS can be performed for a wide range of cardiorespiratory complaints including cough, fever, difficulty breathing, chest pain, hypoxia, and chest trauma. It can also facilitate early diagnosis, allowing for appropriate management. Children are excellent candidates for lung POCUS as they have thinner chest walls and smaller thoracic widths than adults.
The lungs were traditionally considered poorly accessible to ultrasound, as ultrasound waves cannot penetrate air-filled structures; however, lung POCUS relies on the interpretation of patterns of artifacts to evaluate the normal, air-filled lungs.
When there is lung pathology, the consolidation or fluid allows for direct visualization of the pathology with lung POCUS and replaces the air artifacts. Fluid in a consolidation or effusion is easily visualized with ultrasound if the fluid has direct contact with the pleural surface. As lung POCUS will only visualize the lung under the probe, it is essential to completely evaluate the lungs anteriorly, laterally, and posteriorly to avoid missing pathology.

Figure 1: Younger children can sit in their parent’s lap and give a hug for lateral and posterior lung scanning.
There are different protocols to scan the lung depending on the purpose of the evaluation. For example, in pneumothorax, we focus on the anterior chest where air rises in a supine patient, and for the extended Focused Assessment with Sonography (eFAST) exam, we focus on more dependent areas where pleural fluid or blood collects. Below we discuss the complete lung exam which is often used in evaluating for pneumonia.

Figure 2: The 6-zone lung scanning protocol includes anterior, lateral, and posterior lung fields bilaterally.

Figure 3: Normal lung with A-lines in longitudinal (left) and transverse (right) orientations

Figure 4: Reverberation artifact and A-lines. The probe sends out ultrasound waves that bounce back and forth between the highly reflective pleural line and the probe (leftmost 3 arrows). The ultrasound machine then interprets these signals as A-lines equidistant from the pleural line (rightmost 3 arrows).

Figure 5: Pneumonia with sonographic hepatization, air bronchograms, and irregular pleural line
Consolidation will appear as a subpleural, hypoechoic, irregularly shaped area, which will move with respirations. It can have the following findings on lung POCUS:

Figure 6: Lung POCUS showing B-lines (A) and a confluence of B-lines, known as the waterfall sign (B)
B-lines represent interstitial fluid and may arise from viral infection, pulmonary edema, or acute respiratory distress syndrome (ARDS).

Figure 7: Lung POCUS with subpleural consolidation
Subpleural consolidations are small hypoechoic or tissue-like structures with pleural line abnormalities and blurred margins (Figure 7 and Video 5). They measure <1 cm and are usually seen with a viral process.

Figure 8: Pleural effusion with linear probe (A) and phased array probe for increased depth (B).
A pleural effusion is visualized as anechoic (black) fluid between the chest wall and lung or between the diaphragm and lung (Figure 8 and Video 6).
In pneumothorax, there is air between the visceral and parietal pleural, so there will be no lung sliding visualized on lung POCUS.
Lung point, when seen, is the edge of the pneumothorax, where regular lung sliding occurs adjacent to absent lung sliding (Video 8).

Figure 9: Lung POCUS showing a normal lung with the seashore sign (A) and a pneumothorax with the barcode sign (B)
M-mode may also be used to evaluate for pneumothorax.
Additional examples can be found in the PEM POCUS: Endotracheal Tube Confirmation article in Section 2 – Indirect Confirmation: Visualize Bilateral Lung Sliding.

Figure 10: Lung abscess with adjacent lung consolidation and pleural effusion
Lung abscess may also be evaluated by lung POCUS and will have a hypoechoic fluid collection (Figure 10).
Lung pathology may be missed without a complete lung POCUS scanning protocol, as you will only see pathology located directly under the probe. The lung POCUS is also operator-dependent, and it has a steep learning curve.
Left Lower Chest
|
 Figure 11: The spleen and the stomach with air may be misinterpreted as consolidation. |
Thymus
|
 Figure 12: Thymus (*) located adjacent to the heart |
There have been multiple studies of lung POCUS identifying pneumonia in children, and several meta-analyses have been published [2-4]. Table 1 summarizes these studies, showing an overall high accuracy for lung POCUS diagnosis of pneumonia in children.
| Study | N | Sensitivity | Specificity | Comments |
|---|---|---|---|---|
| Pereda et al., Pediatrics 2015 | 8 studies; 765 patients |
96% |
93% |
Evidence supports lung POCUS as an alternative for diagnosis of pneumonia in children. |
| Balk et al., Pediatr Pulmonol 2018 | 12 studies; 1510 patients |
96% |
95% |
Lung POCUS had significantly better sensitivity than chest X-ray, which had a sensitivity of 87%. |
| Tsou et al., Acad Emerg Med 2019 | 25 studies; 3353 patients |
94% |
92% |
Significant difference in accuracy between novice and advanced sonographers. |
The patient’s chest X-ray from earlier in the day was interpreted by the pediatric radiologist as negative for consolidation or other pulmonary pathology. You performed a lung POCUS with a linear, high-frequency probe and observed the following:
Though this child with cough, fever, focal lung findings, and respiratory distress had a negative chest X-ray performed 6 hours earlier, your POCUS evaluation identified a left lower lobe pneumonia which helped you make your diagnosis and start the appropriate treatment.
The patient received antibiotics for pneumonia. His work of breathing increased during his emergency department visit, and he was started on high flow nasal cannula at 30 L/min with improvement in his respiratory status. He was admitted to the pediatric intensive care unit. He had a repeat chest X-ray 12 hours later that was interpreted by the pediatric radiologist as having new pleural and parenchymal changes in the left hemithorax with questionable pneumonia. He continued antibiotics, and his repeat X-ray 48 hours later showed a clear left lower lobe consolidation with pleural effusion.

A 10-year-old male with no past medical history presents to the Emergency Department (ED) by EMS for evaluation of an injury sustained while playing tackle football. The patient was forcibly hit by another child against a tree. He complains of sharp right shoulder and chest pain that worsens with movement of his right upper extremity and he arrives wearing a sling to immobilize the arm.
Vitals: BP 123/86; HR 121; RR 25; T 37°C
General: Alert and oriented, in moderate distress
Cardiovascular: RRR without murmurs, rubs, or gallops, peripheral pulses 2+ throughout
Pulmonary: Bilateral breath sounds, clear to auscultation
Chest: Inability to visualize the right medial clavicular notch or clavicular ridge along with palpable tenderness at the right upper sternoclavicular joint
MSK: The shoulders are asymmetric with the right slightly higher than the left. The right arm is held adducted and internally rotated in a sling. The patient is reluctant to abduct the right arm secondary to pain.
Neuro: No gross motor or sensory deficits were appreciated
Non-contributory
Sternoclavicular (SC) joint dislocation
SC joint dislocation can occur with anterior or posterior displacement of the medial clavicular head. Anterior dislocations are mostly caused by medial impact to the lateral shoulder. Anterior dislocations are more common and generally regarded as less serious. Conversely, posterior dislocations are more serious but less common. Posterior dislocations usually result from impact directly to the anterior chest wall. High-speed motor vehicle accidents or high-impact sports are common causes of posterior dislocations.
Subclavian vascular injury, pneumothorax, esophageal injury, cardiac arrhythmias, brachial plexus injury, tracheal injury, and thoracic outlet syndrome are all potential complications of an SC joint dislocation. When the medial head of the clavicle is forced posteriorly into the superior mediastinum several structures are at risk of impingement which could cause serious complications. In patients with suspicion of clavicular fracture or dislocation, the presence of dyspnea, stridor, dysphagia, or hoarseness should raise genuine concern for a compressive mediastinal syndrome that may require emergent closed or surgical relocation attempts.
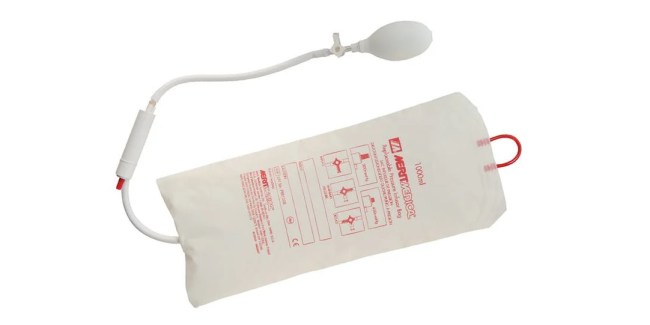 You have a severely dehydrated patient with a peripheral IV line, requiring urgent fluid resuscitation. However, the crystalloid fluids are not flowing freely. Multiple attempts were made to place this line with the latest having a flash of blood return and a smoothly flowing saline flush. You can not seem to find your pressure infusion cuff to squeeze the IV bag and accelerate fluid administration.


Thanks to Twitter feedback from @cpatrick_89, be careful of introducing bacteria when attaching these pieces to the IV tubing, based on an in vitro study. Wearing gloves helped reduce bacterial contamination [1].
Note that conventional pressure bags may not be readily available in emergency departments and could blow the line you worked hard to secure. This “gentle pressure” technique allows the clinician to gauge how much positive pressure to administer to minimize the risk of fluid extravasation.

Welcome to the AIR Infectious Disease Module! After carefully reviewing all relevant posts in the past 12 months from the top 50 sites of the Digital Impact Factor [1], the ALiEM AIR Team is proud to present the highest quality online content related to related to infectious diseases in the Emergency Department. 6 blog posts met our standard of online excellence and were approved for residency training by the AIR Series Board. More specifically, we identified 1 AIR and 5 Honorable Mentions. We recommend programs give 3 hours of III credit for this module.
In an effort to truly emphasize the highest quality posts, we have 2 subsets of recommended resources. The AIR stamp of approval is awarded only to posts scoring above a strict scoring cut-off of ≥30 points (out of 35 total), based on our scoring instrument. The other subset is for “Honorable Mention” posts. These posts have been flagged by and agreed upon by AIR Board members as worthwhile, accurate, unbiased, and appropriately referenced despite an average score.
Interested in taking the AIR quiz for fun or asynchronous (Individualized Interactive Instruction) credit? Please go to the above link. You will need to create a free, 1-time login account.
| Site | Article | Author | Date | Label |
|---|---|---|---|---|
| SGEM | Lumbar punctures in febrile infants with positive urinalysis – it’s just overkill | Dennis Ren, MD | December 31, 2022 | AIR |
| EMDocs | Bacterial Meningitis | Mounir Contreras Cejin, MD | January 28, 2023 | HM |
| ALiEM | The Febrile Infant | Corey Ziemba, MD, Justin Hacnik, MD and J.D. Cambron, DO | March 29, 2023 | HM |
| EMCrit | Approach to CNS infection | Josh Farkas, MD | August 15, 2022 | HM |
| Core EM | Updates in STI Care | Daniel Imas, MD | March 17, 2022 | HM |
| REBEL EM | Short course antibiotics for Peds CAP | Marco Propersi, DO | Dec 5, 2022 | HM |
(AIR = Approved Instructional Resource; HM = Honorable Mention)
If you have any questions or comments on the AIR series, or this AIR module, please contact us!
Thank you to the Society of Academic Emergency Medicine (SAEM) and the Council of EM Residency Directors (CORD) for jointly sponsoring the AIR Series! We are thrilled to partner with both on shaping the future of medical education.

Which cardiotoxic plant is shown?
